Wednesday, June 24, 2020

Rustic Décor: Using Nature’s Colors

Image by Free-Photos from Pixabay 
A big part of creating the peaceful, relaxing ambience of a rustic-style home is the use of color. What makes a color “rustic?” Usually softer tones, neutral colors and colors taken from nature make up the basic color palette of  rustic decor. While nature can be very colorful, depending on where you look, we tend to think of soft blues, greys and greens as well as earth tones like sand, off-white, brown and beige. These are the colors that we find soothing, calming, restful.

How to incorporate those colors into your home? Of course, the use of white and off-white walls, rock and wood are traditional. A little creativity influenced by the outdoors can add some nice touches. Pay attention to details: the color of the rocks along the river, the bark of trees, the muted grey of water and fog – all are inspiration for your home’s color scheme.

macrame cord and lichen
I have been gathering ideas and patterns for a macramé wall hanging. It is to be a piece knotted around a curved stick taken from our forest. The stick has grey-green lichen still attached and I spent some time searching for a matching cord color for the hanging itself. I discovered the shade I wanted, finally, as “sage,” and it seems a perfect match for the lichen-covered stick.

While colors in nature always seem a bit muted and subdued – gray green rather than bright green, pale gold, soft robin’s egg blue – there is always that pop of color, especially in the spring when you get the bright yellows of buttercups, or the clear blue of bachelor’s buttons. While your home might have the softer, more neutral colors as background, add a pop of color here and there: the large sunflower, the window box of pansies, a shelf of brightly colored crockery.

The effect of color on mood and our emotions has long been studied and documented. The colors you use go a long way toward creating the peaceful, welcoming home you desire.
Margaret


Friday, June 19, 2020

How To Make a Pinecone Flower Arrangement

decoupage pot and pine cone flowers
We are having a lot of fun experimenting with our pinecone flowers. We’ve also worked with moss, pinecone and sweet gum pod picks - and decoupage. Something on Pinterest inspired me to put all those things together and make a floral centerpiece featuring hand painted pinecone flowers.

Here is the process if you want to try your own.

You need:


Pinecones
Pruning shears
4 or 5 inch plastic seedling pot
Decoupage glue
Pictures or decorations for pot
Hemp twine
12 inch bamboo skewers
Paint and brush
Hot glue
Dry floral foam
Preserved moss

We kept it simple and used plastic 4 inch planters we get by the dozen for gardening. In our case we might want to sell and ship them, so weight is a consideration. Also, we have a bunch just lying around, so no need to run to the store. However, a cuter look would be the heavier clay pots or ceramic flower pots if shipping weight is not an issue.

The first step is to decorate the plain black plastic pots. We chose a flower print and decoupage for one. This was trickier than anticipated as we put the printed photos on like wallpaper and the edges had to match. Turns out the pots have a slight taper, making the process more difficult than it might have been. Still, the end result was acceptable for a first try.

hemp twine wrapped pot
The second pot, same size, I wrapped in hemp twine using glue. Messy, but not a bad rustic look. Another look I want to try is wrapping the pot with a strip of lace or hemp ribbon.

The cone flowers take the most time. We use pinecones, washed and dried in a low (200°) oven to kill bugs, then cut into halves or thirds, depending on the size. This is not as easy as it sounds as dried, open cones are hard and resist cutting. A sharp pair of pruning shears seems the best option. My internet search for “easy ways to cut pine cones” led to the same conclusion, although other ideas include clamping them in a vise and using a powered Dremel tool or saw. We are getting better at the cutting, although it still takes some hand strength
pruning shears and pinecone
to wield the pruning shears.

Once the cones are cut, remove any remaining seeds, the papery membranes (seed at one end) that lay along the cone scales. We use long tweezers to remove seeds.

Now the cones flowers are ready for painting. You can use spray paint, and we have. Our current favorite method is craft paint applied with small brushes by hand. I put one coat on the bottom of the “flower,” then paint the top. After that dries I add a second coat just to the top. Here is where you let your creativity shine. You can leave the flowers one color, looking like daisies or zinnias (the bottom of the cone) or you can add various touches, putting a darker color down the center of each “leaf,” or outlining the leaves in black or a another contrasting color. 
painted pine cone flowers

The next step involves a drill, hot glue and bamboo skewers. We use twelve-inch skewers which you can buy inexpensively in bundles of several hundred. Their intended use is for barbeque, but they make great picks for pinecones, cone flowers or sweet gum pods. They are easy to cut to the desired length and are already pointed at one end.

This year my grown children gave me the perfect gift for Mother’s Day: a cordless drill with something like 80 attachments and drill bits. So, if your drill is charged up, insert the drill bit that matches the diameter of the wooden skewer. The cone flowers are sturdy enough we have not found it a problem to hold them steady and drill a small hole in the center underside of the flower. They are hard and woody, so it may take a few minutes to get ¼ inch hole.

Fire up your glue gun and apply a drop to the hole, then insert the round – not the pointed – end of
pine cone flowers and moss
the skewer into the hole and hold for a few moments until the glue sets. You now have a flower pick.

There are two types of florist foam and you want to get “dry” foam, not wet. Wet is designed to hold water for your live floral arrangements. The dry is light Styrofoam, usually green, that holds artificial arrangements in place. 

Cut a square of foam to fit inside your decorated pot. It should be a half-inch or so below the top edge and needs to fit snuggly into the inside.

To create the illusion of grass and leaves, we have been using preserved sphagnum moss. This was prepared by soaking fresh moss in a heated mixture of water and glycerin, and so far, the moss has remained good for several months. The process changed the color to an olive green. Sphagnum moss has feathery tendrils that look somewhat like leaves, so it was fairly easy to hot glue them to the top of the dry foam, creating a grassy, feathery look. 

Next, we simply inserted our cone flower picks into the dry foam, creating a pot of colorful flowers.

And there you have it! 
Margaret


Wednesday, June 3, 2020

Rustic Decor: Finding Our Way Home

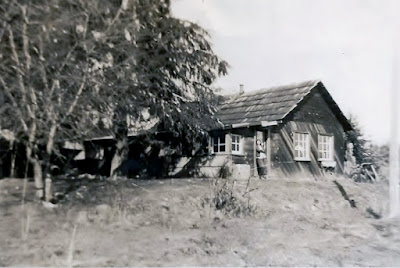
Author's childhood home
It’s hard to believe, but once upon a time rustic style décor was not cool. Some accounts say the country or rustic style of furnishings and home decorations started as early as 1840 during a period when there was a move – in some circles – toward primitive and back-to-nature. 

My family was not in those circles. In 1840 we were part of the original rustic movement, homesteaders living in authentic sod houses with rough wooden furnishings. The modern rustic style began sometime in the 1970’s, apparently, (don’t quote me on that.) There was a move away from the sleek and plastic toward the natural and repurposed at that time that has only grown since. 

It is still going strong, with a growing interest in nature-inspired themes and warm rustic colors and textures.

As someone who grew up surrounded by genuine rustic décor, like it or not, I am intrigued by this hunger for authentic, natural and time-worn surroundings. The real thing, in my experience, was too often accompanied by a lack of resources and amenities that many of us now take for granted. As children we used wooden crates (“orange crates”) as bedside tables or bookshelves. I put a board across two, tacked a gathered length of fabric around the ensemble and created my own dressing table. Rustic. But I really aspired to a new, shiny store-bought one.  

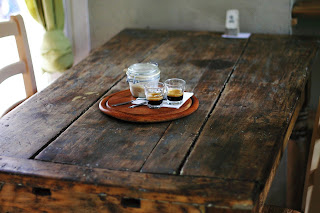
What brought me, and so many others, back to an appreciation of rustic elements in our homes? Speaking only for myself, I think there is a deeper appreciation for my roots, for an earlier, simpler lifestyle, and one that appears – at this distance – to have had more depth and meaning. Handcrafted items speak of care and attention to detail, of things lovingly crafted for a specific purpose. Some items have the irreplaceable patina and glow of many years of use, whether it be the old wooden rolling pin made irregular and polished by generations of cooks, or the wooden kitchen table with the “distressed” look created by thousands of family meals and gatherings.

Now we buy things already “distressed,” made to look rustic on purpose. We once grabbed an old canning jar to hold our bouquet of wildflowers, since we had nothing else - now we buy one made for that purpose. Now that I can afford the glass vase, why do I choose the canning jar? 

One of my first memories of beauty in home decor was of my mother’s pansies filling a plain wooden window box beneath the living room window. As you can see from the old photo above, we lived in a small house or cabin built of thick, wide Douglas fir planks. The shingles on the roof had been hand split and were probably of cedar. The window box was also of wide fir boards and no part of the house had ever seen a coat of paint, or ever would.

As a tiny tot, I stood next to the house wall and ran my hand over the grainy weathered wood of those twelve-inch planks. The texture, the color variations, the curve of the grain around a knot, all created a life-long impression as did my mother’s lace curtains against the small-paned windows, the pansies in the window-box. I know in my home furnishings I want to invoke that innocent time, the rustic cabin under the tall firs, the wooden door opening to a world of grass and flowers, and the taste of
hot, sweet blackberries overgrowing a shed door.

It’s a cocoon, a safe, sweet place that is conjured up by rough wood floors, the scarred kitchen table, the fire in the fireplace. We wrap grandma’s old quilt around us, secure in the peace and security of…home.

We all need that, and with the world seeming to spin more out of control, rustic décor will continue to attract and resonate with many in spite of not having experienced the authentic pioneer lifestyle, or maybe because of not having experienced it. 

C.S. Lewis wrote, “If we find ourselves with a desire that nothing in this world can satisfy, the most probable explanation is that we were made for another world.”

It’s a good thing to create safe spaces, rustic spaces, for our modern selves. This longing for simple beauty, nature and peace is a good thing, but I suspect – and this is what C.S. Lewis was alluding to – it also stirs up an old yearning for something deeper, “…to find the place where all the beauty came from,” as he said elsewhere.

Perhaps rustic décor is actually pointing the way…home.
Margaret